about us | links | permit info
Subscribe to Hiking With My Brother Email Subscribe Follow Hiking With My Brother on Facebook Follow Hiking With My Brother on Twitter Hiking With My Brother Picasa Hiking With My Brother YouTube

Horseshoe Mine

Our Hiking Time: 3h 30m
Total Ascent: 2000ft
Highest Point: 2800ft
Total Distance: 5.6 miles
Location: N 47° 28.253,  W 121° 37.702
Required Permit: None
Difficulty: Hard (due to route finding)

Nathan's PhotoPlease note that Middle Fork Road is in the process of being paved. It may be that access to this trail is limited during construction.

A few weeks ago we decided to head back to the Middle Fork Snoqualmie Area to do a little more exploring. After doing a bit of research we found a few references to a copper mine that had been carved into the slopes of Mailbox Peak above Granite Creek near the Granite Lake Trail. We’ve made the hike out to Granite Lakes in the past, so we decided to try an alternative approach for this trek up to the seldom visited Horseshoe Mine.

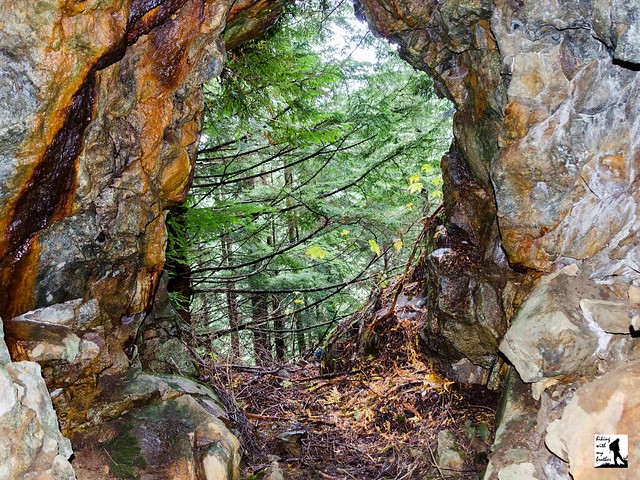
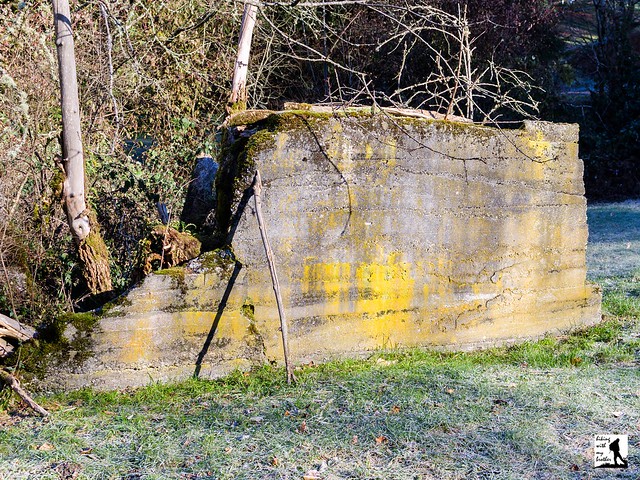
The Horse Shoe Mining Company was established in Seattle in 1904 and eventually held 11 claims covering 220 acres of land in the Middle Fork Snoqualmie and Pratt River Valleys. The company joined other mining operations already working along Quartz Creek and in the Dutch Miller area. One of the company’s first claims was known as “Horse Shoe” and was centered around a four-foot wide vein of bornite ore. From this vein, now known as the Horseshoe Mine, miners used hand drills to follow the bornite a few hundred feet into Mailbox Peak. The bornite was then hauled out of the river valley to be smelted down for its copper. Sometime before 1909 the bornite ran out and the company abandoned the claim. Today, the remains of the mine slumber in the forests above Granite Creek.

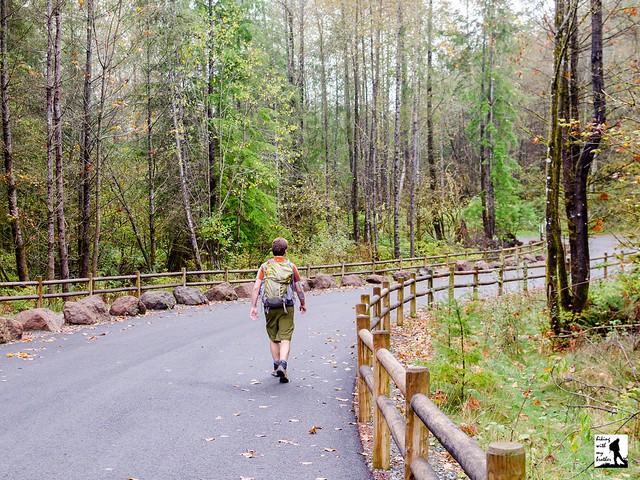
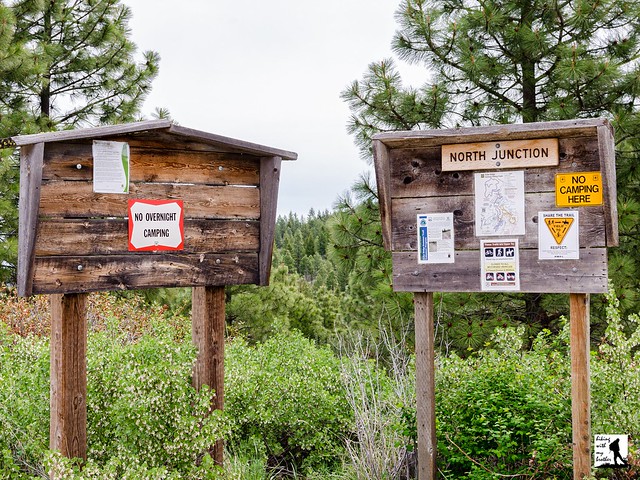
The trail begins directly off the Middle Fork Road, following the remains of an old logging road into a young forest of alder and hemlock. The road is currently marked by a large notice indicating a trailhead, parking area and restroom will be built here soon, making it likely that this approach will be developed in the near future. Continue following the road for .6 miles to a well-marked bootpath leading up and into the trees on your left. From here the thin trail is a little rough, but easy to follow as it works its way up the mountainside. Keep an eye out for the mossy stumps with springboard notches cut into them, a lasting reminder of the area’s timber history.

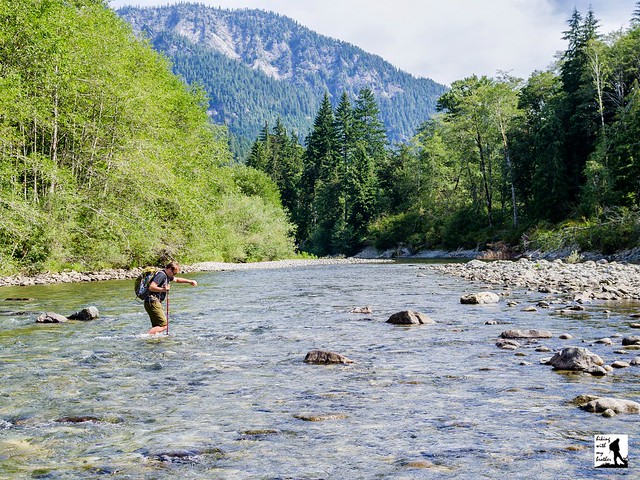
After a half-mile of climbing through encroaching underbrush the path connects with the Granite Lakes Trail. Head left and continue to climb alongside the sound of Granite Creek to the 2.3 mile mark. Look for a slight dip in the trail indicating an overgrown forest road that once provided easy access across the creek. The trail is otherwise unmarked and it will require a little bushwhacking to find a way across. The barely recognizable remains of the bridge that once spanned the creek are still here and can be used, though nearby rocks and logs may prove easier to navigate. Once on the other side the wide roadbed is easy to find and is marked by the rusting remains of a 1941 Chevrolet Special Deluxe Coupe.

Continue following the road as it begins its gentle climb toward the mine. Find a trail leading steeply up the hillside in about a third of a mile, though the road continues on for a few hundred feet. The path is a helpful start, but it soon disappears leaving you with few hints as to the location of the mine. From here, traverse the mountainside in the same direction as the road bed below, continuing to climb upward. Within .1 mile you should reach what remains of a rough road, which eventually leads to the mine. Note that there are few discernible landmarks in this area and it took us quite a while to find the mine without GPS data. If at all possible, bring along a GPS with our tracks as it will make it much easier to reach your destination.

We don’t recommend this hike for everyone, as some route finding skills are required to find your way to the mine. However, if you’re comfortable with a little adventure, this is a fun alternative to the Mailbox Peak crowds. If you’re looking for a longer hike, you can get some more mileage by starting from the Granite Lakes Trailhead rather than the shortcut we recommend here. As always, use caution around the mine as it could be unstable.

To get there, take I-90 to exit 34 and take a left onto 468th Ave. Follow the road past the truck stop for about a half-mile until you reach SE Middle Fork Road, also known as Forest Road 56. Turn right and follow the road for a few twists and turns, keeping left when the road splits. After 2.2 miles reach SE Dorothy Lake Road. Turn left and continue 2.9 miles to a pullout on the right side of the road just before the bridge crossing the Middle Fork Snoqualmie. Park here and walk a few hundred feet down to the abandoned road to begin the trail. -Nathan

Print Google Directions >>

Horseshoe Mine

Coal Creek Trail - Red Town Trailhead

Our Hiking Time: 1h 45m
Total Ascent: 500ft Out
Highest Point: 650ft
Total Distance: 5.6 miles
Location: N 47° 32.694, W 122° 09.098
Required Permit: None
Difficulty: Easy

Nathan's Photo
With winter now in full swing and the snow beginning to creep down from the mountaintops, our hiking destinations are largely confined to lower elevations. Not long ago we found time to explore Coal Creek Park, an urban greenway that connects Cougar Mountain to Lake Washington. Accessible year-round and steeped in the mining history of the area, this rail-to-trail hike makes for excellent winter hiking.

Coal Creek Park’s friendly greenery gives little indication that nearly all the landscape along the trail has been altered and reshaped by mining activity. Back in 1863, coal was discovered along Coal Creek and over the next 100 years, miners would pull 11 million tons of coal from the slopes of Cougar Mountain before the mines were sealed in 1963. All that coal prompted folks to dub the area "Newcastle Hills," after England's coal-rich city of Newcastle. In 1870, Newcastle Hills coal drove the creation of Seattle's first railroad, the Seattle & Walla Walla, which hauled coal from Cougar Mountain out to Elliot Bay. At that time, horses pulled coal cars along the track down to Lake Washington and a series of barges shuttled to coal out to Elliot Bay to be shipped down to San Francisco. Over time, waste rock from the mining process built up, and much of it was used for fill or piled up near the rail line. Today, most of Coal Creek Park travels through the forests that grew over these piles of waste rock.

The trail begins from the Red Town Trailhead, named for the mining settlement of Red Town that was built in this area. The name was a reference to the red paint that was used on most of the buildings. From the trailhead, cross Lakemont Boulevard to a grassy meadow, following a wide trail toward the sound of a splashing creek. Note the concrete foundation here, which is all that remains of the former Coal Creek Hotel (later known as the Newcastle Hotel). The trail quickly descends past a mine shaft and down to Coal Creek and the old railroad grade. After .25 miles you’ll reach North Creek Falls, a small but pleasant waterfall that flows year-round. As you leave the waterfall, keep an eye on the creek as you will soon see the water flowing over wooden boards. These boards are all that remain of the wooden box that miners built to enclose the creek and build tracks over it.

As you push onward through a forest of alder and Douglas fir, watch for other remnants of the mining past peeking out from beneath a sea of sword fern. At around the .5 mile pass a concrete platform on your left that is the remains of a locomotive turntable. Soon find yourself climbing an elaborate series of wooden bridges and steps before reaching a mining road at the .7 mile mark. Head right and downhill, following the road for another half-mile to a junction with the Primrose Trail, named for the former Primrose Mine. We recommend taking a right and following this trail as it descends deeper into the valley and passes Sandstone Falls in a few tenths of a mile. Continue following the Primrose Trail until it reconnects with the Coal Creek Trail. From here you can head back to the Red Town Trailhead via the Coal Creek Trail to make something of a loop, or continue almost another mile out to the Coal Creek Trailhead where a fish ladder can be found complete with a viewing area. Either way, enjoy this unexpectedly quiet walk through a young forest.

To get there, take I-90 to Exit 13. Head right up the hill on Lakemont Boulevard just over three miles. Look for the entrance to the Red Town Trailhead on the left side of the road. - Nathan

Print Google Directions >>

Coal Creek Trail

Echo Ridge - Outback Trail

Our Hiking Time: 2h 30m
Total Ascent: 800ft
Highest Point: 4300ft
Total Distance: 5.9 miles
Location: N 47° 57.550, W 120° 2.660
Required Permit: None
Difficulty: Moderate

Nathan's PhotoLast summer we spent a weekend hiking and exploring the ridges surrounding Lake Chelan. Our tour included everything from creekside trail and windswept mountaintops to quiet state park walks. One of our stops was to the Outback Trail on Echo Ridge, a popular winter recreation area that offers big views of Lake Chelan and the surrounding landscape.

Developed in 1988, the Echo Ridge Nordic Ski Area is part of the Okanogan-Wenatchee National Forest but is largely maintained and managed by the Lake Chelan Nordic Ski Club. During the winter months, there’s opportunity for cross-country skiing, snowmobiling and snowshoeing along roughly 25 miles of looping trails, much of which is groomed. During the summer months, the area attracts bikers, hikers and equestrians.

The Outback Trail begins from the signed North Junction Trailhead, following a forest road toward the heights of Echo Ridge. The area is mostly scrubland, punctuated by small pines and scotch broom, with wildflowers during the spring and early summer. After a flat .6 miles of hiking the trail splits into a loop, and while either direction will get you where you’re going, we recommend heading left for an easy stroll out to your first views of the lake and valley below. As you continue onward, the route heads behind the ridge and temporarily leaves the views behind as it begins to gently climb up through an increasingly rocky landscape. At 2 miles from the trailhead you’ll arrive at the spur road to the summit.

Follow the road as it traverses back toward the lake and ends in about a half-mile. From here, follow the rough and rocky bootpath another .4 miles up the ridgeline to the top. The best views of the hike are along this .4-mile climb to the top. Here you can pick out the snowcapped Enchantment Range, nearby Goat Mountain and Lake Chelan. The summit itself is situated in a grassy meadow largely surrounded by pines. Once you reach the summit rocks, make sure to take a look around for a geocache and add your name to the list. Once you’ve had your fill head back down to the main road and head right to complete the loop and return to the trailhead.

Echo Ridge is well worth a visit any time of year, though it does shine during the winter months. The easy access to higher elevations means that snowshoers are likely to find sunny, snowy views on their visit, especially along the Outback Trail. All of the trails are easy or moderate, which makes Echo Ridge an ideal destination for almost any hiker. Note that if downhill skiing is more your speed, the Echo Valley Ski Area is located at the base of Echo Ridge.

To get there, take I-90 to Exit 85 to Cle Elum/Leavenworth. Cross the freeway and head right on WA 970 toward Leavenworth as it merges into WA 97. As WA 97 ends, merge onto US 2 toward Wenatchee following signs for US 2 and WA 97. In West Wenatchee, follow signs for WA 97 ALT. Once on WA 97 ALT, continue 33.7 miles to Woodin Ave, taking a left into Chelan. Once across the bridge take a left onto N Columbia Street, then another left onto State Route 150. Follow State Route 150 for 1.8 miles to Boyd Road. Veer right onto Boyd Road and follow for 2.6 miles to a split, where you'll stay left on Boyd Road for another 1.8 miles to reach Cooper Gulch Road. Keep right on Cooper Gulch Road for 2.9 miles to a T-intersection. Turn right onto FR 8021 and continue 2.5 miles to the North Junction Trailhead. -Nathan


Print Google Directions >>

Echo Ridge

Spray Park and Spray Falls

Our Hiking Time: 5h 30m
Total Ascent: 1600ft
Highest Point: 6400ft
Total Distance: 8.0 miles
Location: N 46° 55.297, W 121° 49.135
Required Permit: National Park Pass
Difficulty: Moderate

Nathan's Photo
One of our longer overnights this summer involved a visit to the the Mowich Lake area. Popular and easily accessible, Mowich Lake serves as a jumping off point for a variety of adventures ranging from multi-day backpacks to short day hikes. Perhaps the most impressive destination is a sprawling series of alpine meadows on the northern flanks of Mt. Rainier known as Spray Park. Complete with a stunning waterfall, fields of wildflowers, and the mountain’s sparkling glaciers, this is a hike you will never forget.

Around 105,000 years ago, vents opened on the northern side of Mt. Rainier, which spewed a layer of hard lava into the surrounding area and formed the foundation of Spray and Mist Park. Today we know those vents as Echo Rock and Observation Rock. Around 1881, the Northern Pacific Railroad became interested in the northwest portion of Mt. Rainier and sent a geologist named Bailey Willis to look for coal and to see if the area was suitable for tourism. Part of Willis’s expedition involved cutting a trail from Wilkerson to Mowich Lake that became known as the Grindstone Trail. From Mowich Lake, Willis explored the region and by 1883 he had built a route to Spray Park, the Bailey Willis Trail, and led visitors up into the alpine wonderland.

It was likely during the construction of the Bailey Willis Trail that Spray Falls was first found. At the falls, Spray Creek tumbles hundreds of feet down steep cliffs to break into a misty spray of water. The creek, falls, and park are all named for this display. Over time, the Bailey Willis Trail to Spray Park was eventually replaced by the Spray Park Trail used today, though there are still a few sections that follow the old route.

From the Mowich Lake camping area, the well-signed trail begins by descending into a forest of cedar and fir rising out of a blanket of greenery. After a few switchbacks and .2 miles of hiking find yourself at a junction with the Wonderland Trail. Veer right, following the sign that points toward Spray Park and Eagle’s Roost Camp. Legions of boot steps keep this trail clear and easy to navigate as it crosses over creeks and traverses forested ridges. After another 1.2 miles arrive at the Eagle Cliff Viewpoint, a small area where trees have been cleared to offer a lovely view of Mt. Rainier. This is a good place to drop your pack for a short rest before continuing onward.

From Eagle Cliff, continue another .5 mile past Eagle’s Roost Camp to the spur trail leading out to Spray Falls. This short side trip is not to be missed, and adds less than a half-mile of hiking. Descend down to Spray Creek and crane your neck to take in the tumbling falls. Slightly better views are possible if you can find an easy way to cross the creek. After you’ve taken in the namesake falls, head back up to the main trail and get ready for a climb. The trail begins a series of tight switchbacks straight up the mountainside.

After .7 miles of climbing, cross Spray Creek and enter the edge of Spray Park. Wander through a meadow and follow the trail as it continues to open up, getting that much better with every step. While it is hard to find a stopping point that isn’t stunning, we recommend you continue to climb and leave the crowds behind. Press on to the high point of the trail that divides Spray Park and Seattle Park, roughly 4 miles from the trailhead. Here you’ll find big views of both parks and a side trail that leads out to Observation Rock. No need to follow that trail too far -- a short scramble will get you face-to-face with the mountain.

Whether you’re visiting Spray Park for the day or just passing through on your way to your next campsite, the experience is sure to linger. For that reason, you can expect a lot of company during the summer months, though the crowds thin the further you press into the park. This hike should be approachable for most hikers, though the elevation gain may put it out of reach for very young or inexperienced hikers. If you haven’t been, make a trek through Spray Park’s meadows part of your next backpacking excursion.

To get there, take I-5 South to I-405. From I-405 take SR 167 south toward Auburn. In 20 miles take the SR 410 Exit toward Sumner/Yakima. Follow SR 410 for 12 miles to SR 165. Take a right and continue on SR 165 for about 10 miles through Wilkeson and Carbonado to the Carbon River Road/Mowich Lake Road junction. Veer right onto the Mowich Lake Road and follow for 16.2 miles to the end of the road and the trailhead. -Nathan

Print Google Directions >>

Spray Park

Weekend Hike Calendar 2015!

Jer's PhotoFor the 4th year in a row, we've put together a great calendar to inspire a different hiking trip every weekend in the new year. The Weekend Hike Calendar 2015 recommends a different hike every Saturday in 2015 that we've chosen specifically with the season in mind.

Of course all the hike details, including directions, history, and photos can be found on hikingwithmybrother.com or in our new book Hiking Through History Washington. A full preview of the calendar is below and we hope you pick one up this holiday season.

Be sure to check Lulu.com for promotional discount codes! -Jer


Support independent publishing: Buy this calendar on Lulu.

Tolmie Peak Lookout

Our Hiking Time: 3h 20m
Total Ascent: 1100ft
Highest Point: 5900ft
Total Distance: 5.4 miles
Location: N 46° 57.444, W 121° 52.867
Required Permit: National Park Pass
Difficulty: Moderate

Nathan's Photo
One of our longer overnights this summer involved a visit to the the Mowich Lake area. Popular and easily accessible, Mowich Lake serves as a jumping off point for a variety of adventures ranging from multi-day backpacks to short day hikes. Among the day hikes, a hike out to Tolmie Peak Lookout is among the most popular. With iconic views of Mt. Rainier and an operational fire lookout towering above an alpine lake, this hike should be on every hiker's bucket list.

Back in 1833, the newly hired Dr. William Fraser Tolmie arrived at Fort Vancouver to begin his tenure with the Hudson Bay Company. He immediately set off for Ft. Nisqually, a trading post situated in the Nisqually Basin. On his trip north, he caught his first glimpses of Mt. Rainier and made the decision to visit the mountain in the coming months. In August of 1833, Tolmie set off on a “botanizing excursion” with a number of Native American guides. The first European to explore this area, Tolmie was the first to report the mountain’s glaciers. During his trip, Tolmie climbed an exposed peak to get a better view of Rainier. Tolmie Peak is named in honor of that climb, though most historians now believe he was climbing up Hessong Rock.

In 1883, the lake below Tolmie Peak was dubbed Tolmie Lake. However, when it came time to map the area, the name was changed to Eunice Lake in honor of Mrs. W. H. Eunice Gilstrap, a frequent visitor to the area and wife of a Washington historian. Over time, the need for fire lookouts in the foothills around Mt. Rainier became increasingly apparent. Park officials quickly found that outposts on the mountain itself were often made ineffective by the cloud cover that Mt. Rainier is almost constantly creating. By the 1930s the Civilian Conservation Corps was hard at work building several lookouts, including the Tolmie Peak Fire Lookout that went up in 1933. Named a National Historic Place in 1991, today rangers staff the lookout on summer weekends to interact with visitors.

The trail begins from the Mowich Lake parking area, quickly dropping down to the lake and meandering along the lakeshore. Soon the well-trodden path slips deeper into a vibrant forest and begins to climb leaving the lake behind. After a few switchbacks and a mile of hiking reach the Wonderland Trail. Eunice Lake and the lookout are to the right, but before you head that direction, take a left and walk the few hundred feet to Ipsut Pass and the Ipsut Creek Basin. Once you’ve had a look, head back to the junction and continue onward.

From here, the trail becomes a bit more challenging, dropping slightly before climbing steeply up the mountainside. Press upward through a series of tight switchbacks before the forest begins to thin and you find yourself wandering through alpine meadows. After .9 miles of hiking, reach the shores of Eunice Lake. Take a few minutes to explore the shore and find the lookout perched on the cliffs high above the water. When you’re ready, gather yourself for the last steep push to the lookout. It’s another 600 feet or so to the top, but it is well worth the effort. While the views from the top are commanding in all directions, you’ll be hard pressed to look at anything other than the snow covered mountain that fills most of the southern horizon.

Popular and not too challenging, Tolmie Peak is a good choice for most hikers. There is something for everyone on this one. Not only is the view of Mt. Rainier spectacular, but Eunice Lake is a destination unto itself. During the late spring and summer, wildflowers are abundant in the meadows around the lake. The popularity of the hike likely means you’ll be sharing the summit, but the landscape is distracting enough to make it unlikely that you’ll notice the crowds. If you haven’t been up to Tolmie Peak, make sure to put this one on your list for next season.

To get there, take I-5 South to I-405. From I-405 take SR 167 south toward Auburn. In 20 miles take the SR 410 Exit toward Sumner/Yakima. Follow SR 410 for 12 miles to SR 165. Take a right and continue on SR 165 for about 10 miles through Wilkeson to the Carbon River Road/Mowich Lake Road junction. Veer right onto the Mowich Lake Road and follow for 16.2 miles to the end of the road and the trailhead. -Nathan

Print Google Directions >>

Tolmie Peak

Little Bear Trail at Lake Chelan State Park

Our Hiking Time: 1h
Total Ascent: 250ft
Highest Point: 1350ft
Total Distance: 2.3 miles
Location: N 47° 52.325, W 120° 11.851
Required Permit: Discover Pass
Difficulty: Easy

Nathan's Photo
A few months ago we spent a weekend checking out a handful of hikes around Lake Chelan. Our tour included everything from creekside trails, windswept mountain tops to quiet state park walks. Our visit to the Little Bear Trail in Lake Chelan State Park was easily the most sedate of the trip, but this family-friendly walk managed to pack a variety of landscapes into just a few miles of hiking.

The 127-acre Lake Chelan State Park is situated on the shores of Lake Chelan and is divided by the South Lakeshore Road.  For generations, Native Americans called this area home and the park contains a few archeological sites from that era. The park is also host to a cabin once owned by John Stevenson, one of the area’s earliest homesteaders. According to the Washington Parks Commission, most of the land that now makes up the park was acquired as a result of a court settlement in 1943. The issue involved a real estate scheme that involved selling investors “lakeshore” property that was in reality nowhere near the lake. While the park’s focus has long been on Lake Chelan, in recently years other areas of the park have been developed including the Little Bear Trail. The trail is named after the bear cub that was spotted by rangers as they surveyed a route for the trail.  After that encounter, the cub became something of an unofficial mascot during the trail’s construction and the trail was eventually named in honor of the cub.

From the parking area, the trail sets off into the woods and quickly into a short tunnel beneath South Lakeshore Road. Once through, start wandering under a pine forest that has remained largely untouched since the park's creation in the 1940s. After a few minutes of walking, you will find yourself at a junction. Heading right will take you down the Forest Loop, whereas heading left will take you down the Bitterbrush Loop. You can go either way, though we suggest heading left and making a wide loop that includes both trails.

After you head left, you will soon will pass another junction.  This is the turn off for Forest Loop that leads to the upper reaches of the trail. Ignore it and continue onward. As you progress, the trail  leaves the shelter of the forest to trek through Eastern Washington Ponderosa pine savanna.  Here you'll find grassy areas punctuated with Ponderosas and bitterbrush, as well as decent views of the lake. Eventually you’ll hook back toward the woods and spend time wandering under the Forest Loop’s canopy before finding yourself back at the first junction.

Short, easy, and close to Chelan, this hike works well if you’re looking to break up a weekend at the lake. Complete with a number of interpretive signs, this is also a nice choice if you have youngsters in tow. While not a destination unto itself, if you find yourself with a little extra time in Chelan, a short hike might be a great way to stretch the legs before a long car trip home.

To get there, take I-90 to Exit 85 to Cle Elum/Leavenworth. Cross the freeway and head right on WA 970 toward Leavenworth as it merges into WA 97. As WA 97 ends, merge on US 2 toward Wenatchee following signs for US 2 and WA 97. In West Wenatchee, follow signs for WA 97 ALT. Once on WA 97 ALT, continue 23.5 to WA 971, taking a left and following to South Lakeshore Road after 9.1 miles. Take right and immediately find the park entrance on the left. Turn and find parking near the trailhead. -Nathan

Print Google Directions >>

Little Bear Trail

Chenuis Falls

Our Hiking Time: 3h 30m
Total Ascent: 400ft
Highest Point: 2200ft
Total Distance: 7.6 miles
Location: N 46° 59.5499, W 121° 50.5740
Required Permit: National Park Pass
Difficulty: Easy

Nathan's Photo
We made several trips out to the Carbon River Valley this past summer, trekking out to see glaciers, rivers and plenty of waterfalls. Our tour included Chenuis Falls, one of the more popular and easily accessible destinations in the area. With creekside access to a big cascading waterfall and a thick forest of cedar and hemlock to shelter the trail, there’s plenty to see on this low impact hike.

Chenuis Falls tumbles down the side of Chenuis Mountain just before Chenuis Creek joins the Carbon River. The name “chenuis” has been attached to this area for quite some time, and it is thought to be of Native American origin. While we were not able to find a definitive answer, it is believed that it was named in honor of a prominent tribal leader. When the Carbon River Road was open, hikers could drive directly to the Chenuis Falls Trailhead and park, allowing hikers to make a short .2 mile jaunt to the falls with very little effort. Since the Carbon River Road closed in 2008, grass has grown and covered the Chenuis Falls parking area, though it is still easy to see where it was.  The road closure is likely to be permanent, which means a visit to Chenuis Falls now requires an additional 3.7 miles of travel to access.

The hike begins from the Carbon River Entrance, following the Carbon River Road through a temperate rainforest of fir and cedar. The road provides access to a number of hikes, and many people opt to bike the road to cut down on travel time, though there is something to be said for the more leisurely walk through the woods. Flat and wide, the miles pass quickly and easily passing the Green Lake Trailhead after about three miles. The Chenuis Falls Trailhead is just another half-mile or so beyond. The well-signed trailhead will be on your left.

Turn off onto the Chenuis Falls Trail and begin to cross Carbon River's wide and rocky riverbed. A log bridge allows access across the rushing water, though the unruly river has been known to carry the bridge away on a fairly regular basis. If there is no bridge, we do not recommend you attempt to ford the river. Check with the ranger station to make sure the bridge is in place. Once across, the trail quickly leads to a rocky area with excellent views of the falls. Settle in for a snack and enjoy the sounds of the water.

Almost entirely flat and easily accessible, Chenuis Falls is perfect for hikers of any age. With the closure of the Carbon River Road, Chenuis Falls has become a hiking destination rather than simply a roadside pit stop. As a result, you can expect a little company on this hike. Still, the falls are well worth a visit whenever you’re in the area. If you’re looking to extend your day, you can head back to the Green Lake Trailhead or push further into the Carbon River Valley and visit Ipsut Campground.

To get there, take I-5 South to I-405. From I-405 take SR 167 south toward Auburn. In 20 miles take the SR 410 Exit toward Sumner/Yakima. Follow SR 410 for 12 miles to SR 165. Take a right and continue on SR 165 for about 10 miles through Wilkeson and Carbonado to the Carbon River Road/Mowich Lake Road junction. Veer left onto the Carbon River Road and follow for 7.7 miles to the Carbon River Entrance of Mt. Rainer and parking. -Nathan

Print Google Directions >>

Chenuis Falls

Ipsut Pass via Carbon River Road

Our Hiking Time: 9h
Total Ascent: 3300ft
Highest Point: 5100ft
Total Distance: 17.2 miles
Location: N 46° 57.0419, W 121° 52.0980
Required Permit: National Park Pass
Difficulty: Hard

Nathan's Photo
This past summer we had the chance to explore a number of trails in the Carbon River area, including portions of the Wonderland Trail. Our Wonderland travels included the Isput Pass Trail, a long trek following Isput Creek up to a secluded mountain pass. Easily one of the more challenging hikes in the area, the upper portions of the route have ample views to distract you on the way up.

“Ipsut” is Chinook Jargon for “to hide” or “keep secret." While Ipsut Pass is somewhat hidden, some form of the Ipsut Pass Trail has been in use for generations. Early Europeans followed well-worn game trails up to this notch between the shoulders of Gove and Castle Peaks and the Wonderland Trail has included a trip over Ipsut Pass since its construction in 1915. In 1925, the Carbon River Road and the Ipsut Creek Campground opened to the public, allowing an easy car camping option along Ipsut Creek for the first time. Between 1933 and 1934 the Civilian Conservation Corps built the Ipsut Creek Patrol Cabin that still stands near the campground. Then, in 1935, the Lake Mowich Road was completed eliminating the need to climb over Ipsut Pass to access areas near Mowich Lake and Tolmie Peak. Today, the Ipsut Pass Trail still sees plenty of hikers, but many use the Mowich Lake Road to avoid the elevation gain on this steep approach.

The hike begins from the Carbon River Entrance, following the Carbon River Road through a temperate rain forest of fir and cedar. The road provides access to a number of hikes, and many people opt to bike the road to cut down on travel time, though there is something to be said for the more leisurely walk through the woods. Flat and wide, the miles pass quickly and easily, passing the Green Lake Trailhead after about three miles and the Chenuis Falls Trailhead another half-mile or so beyond. The river is your constant companion as you push past these popular day hikes toward Ipsut Campground. The campground is a good place to stop for a breather or to set up camp if you’re planning on a longer trip.

From the campground, the road quickly transitions to trail, and the lush forest closes in. The trail remains almost flat as you cross over a number of creeks and streams each with varying water levels. Stroll for a half-mile to a spur leading out to Ipsut Falls. As the name suggests, the falls are a little hard to see, but it’s worth a few extra minutes to catch a glimpse of the roaring cascade tucked into this rocky gorge. Once you’ve taken a look, head up the trail to the junction a few hundred feet to connect with the Wonderland Trail. Veer right and uphill toward Ipsut Pass and Mowich Lake.

Now the work begins. Everything between the junction and the top of the pass is up, up, up. Some portions are steeper than others, but expect the next 3.3 miles to be an uphill battle. Initially you are confined to the forest, but as you climb the trees give way to open expanses of greenery and underbrush, allowing increasingly better views of the valley below. As you near the top the trail begins to steepen and switchback steadily upwards. The rocky trail runs along exposed cliffs before depositing you at the forested pass. Venturing a few hundred feet over the pass will connect you to the Mowich Lake Trail. Find a welcoming spot to enjoy the view and a hard-earned snack before heading back down.

The elevation and distance on this hike make it a little better suited for an overnight trip than a day hike. Still, a healthy portion of the distance can be covered by bike, which can significantly reduce the hiking time. At the same time, the difficulty of the trail means that you’re likely to be hiking through a lovely landscape without many others. If it's solitude you seek, consider taking on this challenge. Note that if you have two cars, you can also make this a through hike by parking your other vehicle at Mowich Lake, which is only a mile from Ipsut Pass.

To get there, take I-5 South to I-405. From I-405 take SR 167 south toward Auburn. In 20 miles take the SR 410 Exit toward Sumner/Yakima. Follow SR 410 for 12 miles to SR 165. Take a right and continue on SR 165 for about 10 miles through Wilkeson and Carbonado to the Carbon River Road/Mowich Lake Road junction. Veer left onto the Carbon River Road and follow for 7.7 miles to the Carbon River Entrance of Mt. Rainer and parking. -Nathan

Print Google Directions >>

Ipsut Pass

Shortcut to Pratt River Trail #1035

Our Hiking Time: 2h 30m
Total Ascent: 300ft
Highest Point: 1300ft
Total Distance: 3.6 miles
Location: N 47° 30.818,  W 121° 34.197
Required Permit: Discover Pass
Difficulty: Moderate (due to fording river)

Nathan's Photo
Please note that Middle Fork Road is in the process of being paved. It may be that access to this trail is limited during construction.

Last summer we headed back out to the Middle Fork Snoqualmie area to find a trail that had been on our list for quite some time. While the Pratt River Trail #1035 has a long history wrapped up in the Middle Fork’s mining and logging past, it was overgrown and abandoned until relatively recently. While most hikers access the trail from the Gateway Bridge, we opted for the more traditional approach of fording the Middle Fork Snoqualmie River at the height of summer.

Back in 1887, prospectors staked a number of mining claims in the vicinity of Chair Peak. Among them was the namesake of the Pratt River, George A. Pratt, who decided to access his claims via the Pratt River Valley and helped establish the first Pratt River Trail. During this first era, a cabin was built at the confluence of the Pratt and Middle Fork Snoqualmie that became known as the “Halfway House” for its location between North Bend and the Taylor River Ranger Station. The Halfway House provided shelter for those looking to explore the Pratt River Trail, and appeared on USGS maps until the early 1920s, though nothing remains of the cabin today.

In 1934 the North Bend Timber Company acquired the rights to log the Pratt River Valley and quickly began constructing a logging railroad largely following the Pratt River Trail route. A bridge across the Middle Fork was completed in 1936 and the railroad stretched the length of the valley by 1937. Over the next several years, the valley walls were logged up to 300 feet on either side of the tracks, which was the furthest reach of the cables. By 1941 the easy timber had been harvested and the North Bend Timber Company began pulling out the rails, leaving the wooden ties behind. Aside from some intermittent truck logging in the 1950s, this was the end of the major logging operations along the Pratt.

Once the timber interests pulled out the hikers began to return. Some followed the portion of the Pratt River Trail that leads up the Middle Fork toward Goldmyer Hot Springs, while others followed the railroad grade through a recovering forest out toward Melakwa Lake or Talpus Lake. The Forest Service built up the trail, adding boardwalks and small bridges to the sections along the Middle Fork. Eventually the railroad bridge washed out and hikers replaced it in the 1970s with an improvised bridge anchored to stumps on either side of the river. That bridge also washed away, though you can still find the rusting anchoring cables today.

Without a bridge, trail use steadily declined and nature began to take back the trail. It wasn’t until 1993 that the Gateway Bridge was built a few miles upstream, once again allowing hikers to access to the trail. Since that time the trail between the bridge and the Pratt River has been rebuilt and renamed the Pratt River Connector Trail. However, much of the trail along the Pratt River is still overgrown and in need of maintenance.

The hike begins from a pullout along FR 56, marked only by a low wall of moss-covered concrete. Cross a small creek and follow the path as it wanders through blackberries and cottonwood toward the sound of the river. Once you reach the river, head upstream for a few hundred yards while looking across the water for a small trail leading up the embankment. Once you locate it, ford the river and follow the trail a short distance up to the Pratt River Connector Trail. Head right along the wide and well-maintained trail for a few tenths of a mile as the trail connects with the old railroad grade and begins its way up the river valley.

Keep an eye out for artifacts as you press deeper into the valley. Rusting metal, old cables and rotting railroad ties can all be found along the way. After about a mile of hiking arrive at a junction simply signed “Big Trees” and “Trail” with arrows directing hikers where to go. If you’re looking for more trail time, head left and continue to follow the railroad grade until you’ve had your fill. On the other hand, if you want a shorter day you can veer right and downhill to find an enormous, 250ft tall Douglas fir tree about third of a mile down the trail.

There are no big views on this hike, just a hike through a forest that can be as short or long as you would like. Still, the Pratt River Trail is definitely worth a tour, especially for those hikers looking for a bit of adventure. It is possible for experienced hikers to make this a through hike by bushwhacking their way all the way out to the Granite Mountain Trailhead. However, most hikers will be content to trek out to the Big Tree and call it a day, happy to enjoy the quiet solitude of this old trail.

To get there, take I-90 to exit 34 and take a left onto 468th Ave. Follow the road past the truck stop for about a half-mile until you reach SE Middle Fork Road, also known as Forest Road 56. Turn right and follow the road for a few twists and turns, keeping left when the road splits. After 2.2 miles reach SE Dorothy Lake Road. Turn left and continue 6.6 miles to a pullout on the right side of the road marked by some old cement barriers. If you prefer not to ford the river, continue on to the Middle Fork Campground and start the hike from the Gateway Bridge. - Nathan

Print Google Directions >>

Pratt River

New Mailbox Peak Trail

Our Hiking Time: 5h
Total Ascent: 4000ft
Highest Point: 4841ft
Total Distance: 9.6 miles
Location: N 47° 27.745, W 121° 38.354
Required Permit: Discover Pass
Difficulty: Hard

Nathan's PhotoNot long ago, after years of effort, crews officially opened a new route up Mailbox Peak on September 27, 2014. While we had made the grueling trek up to the summit more than once in the past, after the Seattle Times contacted us about the old trail we decided it was time to explore the newly built approach.

Before the 1940s, few hikers ventured up the steep sides of the then-unnamed Mailbox Peak. In 1956, Valley Camp was established near the base of the peak and some adventurous souls began regularly bushwhacking their way to the mountain. Around 1960 Carl Heine, a Seattle letter carrier by day and the camp’s director in his free time, had decided to lug a mailbox to the summit. Campers were then sent up the mountain to sign the summit register left in the mailbox. Over the years, hundreds of boots pounded out a steep path straight up the mountainside.

While the original trailhead started from Valley Camp, logging operations in the 1970s cut a road across the trail and cleared the trees between the road and the camp, effectively obliterating that portion of the trail. Unsigned and still relatively unknown, the hike remained something of a secret amongst a small community of hikers. The hike’s low profile was helped by the difficult to find trailhead tucked a few tenths of a mile behind a gated forest road and famously marked only with toothbrushes jammed discreetly into the ground. That changed in 1991 when Sally Pfeiffer wrote an article for Signpost, the Washington Trail Association’s monthly publication, revealing the location of the trail to the hiking community at large. She also suggested a name: Mailbox Peak.

Since that time, the hike’s popularity has exploded, drawing tens of thousands of hikers up a very rough and narrow trail. Built largely by happenstance, the old trail could not handle the crowds or the inexperienced hikers unprepared for the difficult terrain. As a result, sections of the trail quickly eroded and injuries were common. Today, the new route addresses most of these concerns.

From the parking area, the trail begins, as it has for decades, by walking around a gated forest road and finding a trailhead a few dozen yards down the road. Today’s trailhead is an obvious and well-signed affair, complete with a detailed map of the path ahead. From here, the trail begins relatively gently, crossing a few creeks and a hefty bridge before beginning to switchback in earnest. Veterans of the hike will still find a familiar amount of elevation gain as the trail climbs through a mixed forest of maple, fir and cedar. And climb it does; endlessly and relentlessly up mile after mile of wide, well-made trail.

After four miles and nearly 3500 feet of elevation, arrive at the junction with the old trail. Turn left and get ready for a tough final push to the top. The last half-mile is something of a scramble, as the trail steeply climbs the ridge over a tangle of roots and rocks. Not far from the junction you will emerge from the trees to see the exposed summit in the distance. Press upward and follow the train of people over rock and loose soil to the mailbox. Most likely you’ll be sharing the spectacular views with some fellow hikers, so find a quiet place to take it all in.

To the north find Glacier Peak and Mt. Pilchuck on a clear day. Swing east and pick out the crags of nearby Russian Butte with other peaks of the Middle Fork Snoqualmie River Valley beyond. Kaleetan Peak is easy to pick out before your views are blocked by the next prominence along the ridgeline, sometimes called Dirtybox Peak, for its location between Mailbox and Dirty Harry’s Peak. Turn south passing over McClellan Butte’s distinctive crown to find Mt. Rainier dominating the skyline above the interstate. Find Mt. Washington almost directly across the valley from you and as you swing north you can see Rattlesnake Ridge stretching back toward Seattle. Pass over neighboring Mt. Si and Mt. Teneriffe as you complete your 360-degree tour.

While the new route has smoothed a lot of Mailbox’s edges, it’s still a challenging hike. The hike will continue to be a popular destination for those looking for a great training hike or relatively quick access to big views.  In other words, unless you’re going up on a weekday, you can expect company.  On the upside, the new trail is able to accommodate a lot more hikers by spreading them out over a greater distance. On the downside, the added distance can make for a long day, though you can trim the route by taking the shorter old trail up and the longer new trail back. Keep in mind that the last half-mile has all the same hazards as the old trail and should still be approached with a healthy amount of respect.  If you haven't tackled Mailbox Peak in a while, the new trail is a great new way to explore this old favorite.

To get there, take I-90 to exit 34 and take a left onto 468th Ave. Follow the road past the truck stop for about a half-mile until you reach SE Middle Fork Road, also known as Forest Road 56. Turn right and follow the road for a few twists and turns, keeping left when the road splits. After 2.2 miles reach SE Dorothy Lake Road. Turn left and continue .3 miles find the road up to the parking area on your right. - Nathan

Print Google Directions >>

New Mailbox Peak Trail

Mt. Baldy via Domerie Divide Trail #1308.2

Our Hiking Time: 4h 50m
Total Ascent: 2900ft
Highest Point: 5100ft
Total Distance: 7.4 miles
Location: N 47° 16.2659, W 121° 8.1180
Required Permit: None
Difficulty: Hard

Nathan's Photo
A few weeks ago we headed back over Snoqualmie Pass to further explore the ridges and mountaintops between Kachess Lake and Cle Elum Lake. On our last hike up Easton Ridge, we passed the junction for the Domeire Divide Trail #1308.2 and resolved to come back to see where it led. After some quick research, we were able to trace a route up to a former fire lookout site known as Old Baldy and returned to look for some big views.

The Old Baldy site sits atop Mt. Baldy, which was presumably named for the lack of trees near the summit. A cabin was built here in 1934 and was manned by fire lookouts until it was removed in 1953. Upper portions of today’s trail are built on the route used by the lookouts to access the cabin. In contrast, the trailhead and lower sections of trail were built to support irrigation efforts along Silver Creek. The current trail passes an old wooden irrigation dam that is part of that legacy.  Over the years the Bureau of Land Reclamation has proposed putting more irrigation facilities along Silver Creek, but so far the creek has proven too unpredictable to allow for further dams.

The trail begins from the parking area, marked by a ragged sign pointing toward Trails #1212 and #1315. Find the well signed junction for the Kachess Ridge Trail #1315 just a few feet down the trail. Ignore this junction and instead veer to the right toward the sound of Silver Creek and an unmarked trail dropping down to the water. This is the Easton Ridge Trail #1212. Head to the creekside and soon find a sturdy bridge crossing the water at the base of the irrigation dam. Cross the bridge and climb a few switchbacks up the ridge to the bones of an old forest road. Follow the fading road for a few hundred feet before finding an obvious but unmarked trail heading up the mountainside.


From here, the trail continues to climb through a forest of pine and fir, offering occasional glimpses of Kachess Lake and Kachess Ridge. After 1.3 miles of hiking you’ll attain the ridgeline and arrive at the junction with the Domerie Divide Trail #1308.2. Head left and enjoy a short respite from the climb as the trail meanders along the ridgeline. Soon the route swings uphill and the real climbing begins. Gone are the switchbacks of the lower trail, replaced instead by steeps sections that tackle the climb head-on. Keep in mind that during the summer months, the fine dust of the trail can make for a somewhat slippery climb. As you press ever upward, the trees thin somewhat, providing ample opportunity to take in the surrounding landscape as well as Mt. Baldy in the distance.

Eventually, after more than a mile of climbing, you will attain another ridgeline and find the junction the Domerie Peak Trail #1308. Head right, following the trail as it dips downhill and soon reveals big views of Cle Elum Lake and a sea of peaks and crags. Press onward following the ridge toward the barren summit of Mt. Baldy. Once you reach the base of the summit, the trail turns sharply uphill and begins to fade. If you’re not exactly sure where the trail is, simply keep climbing. Before long, find yourself at the former lookout site, with big 360-degree views. To the north you can easily pick out nearby Red Mountain, with Mt. Daniel and Glacier Peak rising in the distance. Turn east to find Jolly Mountain and Hex Mountain just above Cle Elum Lake, with Mt. Stuart beyond. The plains of eastern Washington stretch toward the horizon as you sweep southward over neighboring Domeire Peak to take in Mt. Rainier. Complete your turn to pick out Silver Peak, Abiel Peak and other Snoqualmie Pass peaks to the northwest. Settle in and break out your map to see how many more peaks you can find.

Steep, long and a little rough, this hike isn’t for everyone. At the same time, it’s not at all surprising that a fire lookout was located here for two decades. The views are enormous and because the trail is on the challenging side, you’re likely to be enjoying the scenery without much company. This is a great choice for those looking for a training hike or an alternative to nearby Kachess Ridge or Easton Ridge.

To get there, take I-90 to Exit 70. Take a left over the freeway and turn left onto West Sparks Road. Continue for a half-mile to FR 4818 (signed Kachess Dam Road) and take a right. Follow FR 4818 for a mile to an unmarked road on the right. Follow this road for a half-mile to the small parking area at the trailhead. -Nathan

Mt. Baldy
Copyright 2008-2016 - hikingwithmybrother.com
hikingwithmybrother@gmail.com