about us | links | permit info
Subscribe to Hiking With My Brother Email Subscribe Follow Hiking With My Brother on Facebook Follow Hiking With My Brother on Twitter Hiking With My Brother Picasa Hiking With My Brother YouTube

Mt. Teneriffe - Kamikaze Trail

Our Hiking Time: 5h 30m
Total Ascent: 3800ft
Highest Point: 4788ft
Total Distance: 6.5 miles
Location: N 47° 30.5160, W 121° 41.7180
Required Permit: Discover Pass
Difficulty: Hard

Nathan's PhotoWith the snow starting to recede from some of the lower mountaintops, we’re already mapping out which peaks and scrambles we want to tackle first. At the top of our list was Mt. Teneriffe, one of a few lesser-known peaks we had been eyeing since last fall. One of the reasons we’ve waited so long on Teneriffe is that the traditional 14-mile route outlined by Manning and other local guide books keeps largely to a decommissioned logging road. Digging a little deeper, however, we found mention of a more direct route to the summit – and it even had an appealing sounding name: the “Kamikaze Trail.” We were sold.

In 1977, Washington State set aside 2,500 acres to form the Mt. Si Conservation Area in order kamikaze falls, mt teneriffe, hikingwithmybrother“to safeguard to the extent possible the scenic, natural, geological, game habitat, and recreational values therein.” Ten years later, in 1987, the Washington Legislature created the Natural Resource Conservation Area Program to provide further protections for “outstanding examples of native ecosystems, habitat for endangered, threatened and sensitive plants and animals, and scenic landscapes.” The Mt. Si Natural Resource Conservation Area (NRCA) was one of the four original sites to receive this new designation, and today boasts over 12,000 acres of protected land. Mt. Teneriffe has long been incorporated into the Mt. Si NRCA, though it is often overlooked in favor of the area’s namesake.

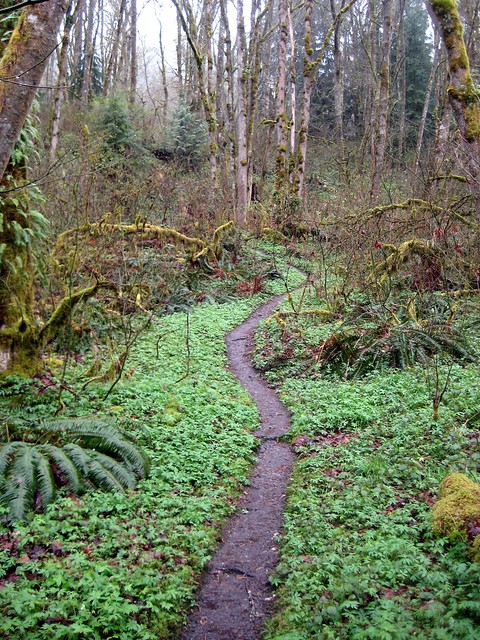
The route we mapped out begins on the same logging road as the traditional route, following it for about a milekamikaze falls, mt teneriffe, hikingwithmybrother 
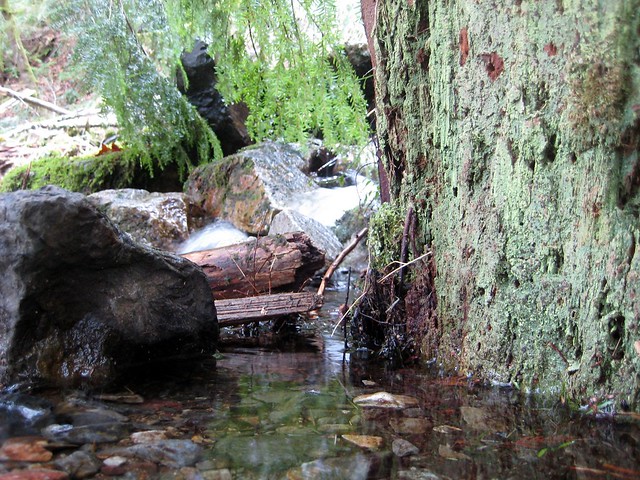
past overgrown water towers and a few abandoned spur roads before veering to the right through young alders and underbrush. The once-road gently hugs the side of Teneriffe through a talus field and over a few small streams until it connects with another trail at Kamikaze Creek. That path in turn steeply ascends along the creek past progressively more dramatic cascades before finally culminating in the 150-foot Kamikaze Falls. We were expecting a stream on our hike, but nothing of the magnitude of these falls. Perhaps more stunning with that the mountain currently thawing out, the falls are still well worth the trek up the mountain – water arcs over the edge of the rocks above you, only to quickly crash into a series of smoothed rocky outcroppings. Take a rest and have a snack: from this point forward, the trail becomes much more of a scramble.

Barely scraped into the side of the mountain, the bootpath is relentless. It rarely entertains the idea of switchbacks, ever-opting for the beeline to the summit, and only grudgingly deviating for massive boulders or impenetrable undergrowth. Cedars and firs stand in seas of salal as the trail gains elevation before beginning to thin and reveal views of Rattlesnake Mountain and Mt. Washington. Upon reaching the summit, soak up the views and take a well-deserved rest. Spy the haystack of Mt. Si just to the west, and neighboring Green Mountain immediately to the northeast. Mailbox Peak and McClellan Butte are to the east. On good days Glacier Peak, Mt. Baker and Mt. Rainier are all in attendance.

This was an excellent hike, though this route is not recommended kamikaze falls, mt teneriffe, hikingwithmybrotherfor an inexperienced hiker. The steep inclines and rough trail are such that hiking poles are a necessity, especially on the descent. We’ve since discovered that other routes to Kamikaze Falls have been closed by the Department of Natural Resources, for fear of environmental damage. On the upside, we also discovered that work on a more sustainable trail to Kamikaze Falls is already underway, and volunteers are headed up to do trail work in the next few weeks.

To get there, take I-90 to Exit 32 at 436th Ave. Head to the left over the freeway to North Bend Way and take a left. Mt. Si Road will very shortly appear on the right. Follow Mt. Si Road past the parking lots for Little Si and Mt. Si to the school bus turnaround where the maintained country road ends. Find a spot to park in the gravel turnaround and head up the gated road to the trail. - Nathan

Print Google Directions >>

Mt. Teneriffe - Kamikaze Trail

Hiking with My Brother featured in Sports Northwest Magazine

Nathan's PhotoHikingwithmybrother.com is featured in the May Issue of Sports Northwest Magazine now out on local newsstands. Sports Northwest approached us a few months ago wanting to know if we’d be interested in writing up a little something for their magazine. We tossed some ideas back and forth before it became clear that they were looking for a bit of excitement to catch their reader’s attention. We had just the story for them which we'll reprint here:

Hiking is usually a fairly tame sport, especially when you’re prepared. So we felt pretty safe on our descent down from the summit of Mt. Rainier – roped in with a professional guide, geared up to the nines in high-tech, waterproof, wind-resistant body armor, flush with the confidence that we’d left the difficult portion of our journey up on Columbia Crest.

Halfway down Disappointment Cleaver, we ran into an inexperienced group trudging down the ridge. Perhaps it was the way they traversed too closely together to benefit from being roped in, or their haphazard play with their ice axes – or even just their unhurried pace – that was so unnerving, but we were happy to get by when they flopped down for a break. Relieved, we quickly pushed past, only to hear the awful sound of earth breaking loose as they inadvertently sent a chair-sized boulder careening down the mountain.

In the face of falling rock, they tell you to stay calm and wait for it to get closer before dodging. This is because divots and protrusions covering the ground can send projectiles in unpredictable directions. The advice is easy enough to remember, but very difficult to execute when you’re staring down a few hundred pounds of moving stone.

Our guide barked orders. We held. But when it came time to jump, Jer and I went in different directions, leaving the rope in the path of the rock. Adrenaline transformed seconds into vast expanses of time, allowing me to completely panic and yet still recover sufficiently to grab the rope with our guide and heave Jer to our side. Despite his 40-pound pack and crampons, Jer was somehow able to leap a few feet in the air, his trailing foot touching off the bounder as it rumbled past.

We hike once a week these days, plowing though snow drifts, battling up extreme inclines, and bush-whacking down barely maintained paths – just a little bit wiser every time. Because no matter how good your gear is, it’s experience that’ll pull you through.


A big thanks to Sports Northwest for reaching out to us and sharing what we do here at hikingwithmybrother.com with their readership. Check out their site or pick up an issue to see what else they’ve put together for you. - Nathan

Best of Hiking with My Brother v2.0

Today hikingwithmybrother.com hit the 6 month mark. Since October 26th 2008, we've reviewed 22 hikes spanning 163 miles and climbing up about 42,000 feet in elevation. Now, everyone has their own unique taste when it come to hiking - what works for some is just not appealing for others. For this reason, we work to gather as much information about a hike as we can, so that our posts can be useful to everyone. Nonetheless, every few months, we like to take a look back at which hikes we really enjoyed and highlight what made them our favorites.

We’ve covered a dozen hikes over the last few months, most of them in the snow. The weather often nudged us toward trekking closer to home and the comforts of civilization. We spent almost half our hikes in the Issaquah Alps; Poo Poo Point, East Tiger, and 15 Mile Creek were all on Tiger Mountain with Taylor Mountain Forest and Phil’s Creek right nearby. The CCC Trail was not only close to home, but really felt more like an active logging road than a hiking trail. Jer and I both prefer to get a little further out into the wilderness, so these were all out of the running for us. Olallie State Park, Stegosaurus Butte, and Franklin Falls were all very short and lacked the trail distance we generally associate with a great hike. We both agreed that Melakwa Lake had some potential, but our experience on the trail was so soured by the weather and trail conditions that day, we couldn't bring ourselves to call it a favorite.

This left us, once again, unable to agree on which hike was the best: Pratt Lake Saddle and Granite Lakes.


Nathan's Photo
Nathan's Pick - Pratt Lake Saddle

Admittedly, one of the reasons I really enjoyed this hike was the circumstance of the day: a beautiful sunny morning, fresh powder for snowshoeing, and an engaging trail. Although the trailhead is popular, the majority of hikers are heading up to enjoy the long views Granite Mountain provides – most steer away from a trip out to Pratt Lake. The variety of routes that you can take to the Saddle is also a bonus for me; the option to go down to Talpus and Olallie Lakes and make this a through hike is a nice alternative to the typical out-and-back experience. The trail itself is engaging but not too strenuous, winding through mature forests, over streams and past the occasional waterfall before opening up for a great view of Mt. Rainier rising over Olallie Lake.

Granite Lakes was a decent hike, and I thoroughly enjoyed it. However, the trail is yet again on a logging road, another tour through recovering clear cuts, and the diminutive lakes themselves were more of a good stopping point than a meaningful destination. While the route does offer the occasional glimpse of a few local mountaintops, hikers are largely confined to looking at the back of Mailbox and Dirty Harry’s Peak. Perhaps if we had pressed on to Thompson Lake or had planned to tackle Mt. Defiance this trail would have felt more like a hike and less like a survey of a Weyerhaeuser timber project. As it stands, the Pratt Lake Saddle experience really outshines Granite Lakes, and is very much worth the trip, even if you need to share it with a few fellow hikers.


Jer's PhotoJer's Pick - Granite Lakes

I’ve chosen Granite Lakes as my favorite hike over the last 3 months because none of the other hikes rivaled its combination of solitude and scenery. Silently tucked beneath Dirty Harry’s Peak, this often ignored pair of quaint lakes provides a quiet retreat in close proximity to civilization. Normally, I would agree with Nathan that trekking on logging roads can be a bit dreary, but these roads have been decommissioned for quite sometime, and nature is already starting to reclaim them. In the winter, I don’t think there is a better place to snowshoe. The trail is extremely easy to follow in the snow, is accessible year round, and is free of avalanche danger.

Pratt Lake Saddle is a decent hike, but sadly you spend the majority of the hike shut in by the forest up to the point where you reach the Saddle. This gives the hike a gloomy feel even on the sunniest of days. Also, if you’re looking to be alone, Pratt Lake is not the hike for you. Close and easy access to the Alpine Lakes Wilderness make this trail extremely popular in the summer. So forget the crowds, and instead enjoy a moderate grade hike through recovering clear-cut and 2nd growth forest that’s filled with views of mountaintops such as Bessemer and Teneriffe.

Squak Mountain - East Ridge to Phil's Creek

Our Hiking Time: 3h 40m
Total Ascent: 1000ft
Highest Point: 1560ft
Total Distance: 8 miles
Location: N 47° 30.6960, W 122° 1.8240
Required Permit: Discover Pass
Difficulty: Easy

Nathan's PhotoA few readers have written to us mentioning that we had given Squak Mountain short shrift with our single exposure to the tamest portions of the park on a rainy day. Finding ourselves in the mood for a short hike this week, we decided to give Squak another chance, albeit still on a very wet and rainy day. Ignoring the popular trailheads, we instead headed to an obscure entrance point off the Issaquah-Hobart Road. We hoped this would give us direct access to those “wild” portions of the park both Harvey Manning and our readers hinted at.

squak mountain east ridge phils creek hikingwithmybrotherThis area of the park does, in fact, have a different feel to it. Squak was never logged to the same degree that Tiger and Cougar have been, and while there is clear evidence of logging in the form of large decaying tree stumps, most of the park has been sheltered from the axe for quite some time. This is largely due to the explicit restrictions the Bullitt family placed on the use of the 590 acres they donated the State of Washington back in the 1970’s that became the heart of the now much larger Squak Mountain State Park. Logging and motorized vehicles are prohibited in most of the park, something of a contrast to the “working” forests of Tiger and Cougar.

We found ourselves hiking merrily along a snow-free path towards Phil’s Creek, the arbitrary destination we’d chosen out of a hat. With so many little side trails and loops to explore there squak mountain east ridge phils creek hikingwithmybrotherwas a lot of opportunity to change our minds if we didn’t like where we ended up. Despite the rain, the lushness of the woods in the springtime was a welcome experience. After weeks of snow and lifeless bramble, leaves are appearing and flowers are already budding. As we switchbacked up Squak on the East Ridge trail, we occasionally caught a foggy glimpse of the surrounding mountains through peek-a-boo portals in the forest wall. We found Phil’s Creek and followed it to the park boundary, enjoying a landscape that fluidly transitioned from dense second-generation firs and pines to marshy wetlands and stands of alder.

Lots of activity and trail improvement is currently underway, so expect to see some volunteers improving the path and repairing some of the washed-out and damaged sections of trail. We still found Squak to be a great choice for trail running or a casual stroll; we also discovered some of the many equestrian trails that the park also has to offer. Squak definitely had some more to offer us on a rainy day than we had given it credit for, and with over 1,500 squak mountain east ridge phils creek hikingwithmybrotheracres to tromp through, there’s still more to explore.

To get to the trailhead we used, take I-90 to Exit 17 and take a right on Front Street. After you pass through downtown Issaquah and just before Front Street becomes the Issaquah-Hobart Road, keep an eye out for Sycamore Drive on the left. Follow Sycamore Drive as it twists itself into Hillside Drive and finally Crystal Creek Circle. You’ll see a gravel path between the houses barred by a couple of wooden posts with white painted tops on your left. Park along the street and head up. - Nathan

Print Google Directions >>

Squak Mountain East Ridge

Pratt Lake Saddle

Our Hiking Time: 5h 45m
Total Ascent: 2200ft
Highest Point: 4500ft
Total Distance: 8 miles
Location: N 47° 25.4880, W 121° 30.7740
Required Permit: Northwest Forest Pass
Difficulty: Moderate

Nathan's PhotoAfter weeks of clouds and snow, bright sun and clear skies marked the first really good hiking weekend of the year. The much-anticipated break in the weather demanded that we take advantage of it with a hike that had some elevation and broad vistas. A trip out to Pratt Lake Saddle promised both. We got an early start and headed out to the Pratt Lake/Granite Mountain Trailhead.

The Pratt Lake Trail #1007 is one of the gateways into the Alpine pratt lake saddle hikingwithmybrotherLakes Wilderness Area, and gives access to many lakes and peaks. As it begins, the trail is well-worn and wide, crossing small creeks and rivulets through pleasant stands of maturing firs and pines. Just over a mile into the trail, the junction for Granite Mountain Trail #1016 appears on your right. Continue onward for the first of the real elevation gain, skirting the slopes of Granite Mountain and occasionally catching glimpses of mountaintops through windows in the trees carved by streams and talus fields. Just past the three mile mark, the trail intersects with the Talapus Lake Cutoff #1039, offering access to the shores of both Talapus Lake and Olallie Lake. At four miles we reached our destination: the 4,200ft ridge on the slopes of Pratt Mountain commonly referred to as the “Saddle.” From here the trail descends down to Pratt Lake before meeting up with the Melawka Lake Trail #1011.

Finding the trail fairly well-broken and friendly, we moved quickly and passed a number of groups on the trail. The more people we passed, however, the rougher the snowshoe path became, until we caught up to the gentleman who had done us all a favor by blazing the way. Naturally, after all the work he had done, we offered to take our turn at cutting a path to the Saddle.

It was slow going, but we managed to cover a great deal of ground despite sinking up to our pratt lake saddle hikingwithmybrotherthighs in deep powder and taking slow, deliberate steps. When the groups we had passed caught up with us, we initially let them by to give them a turn at breaking the trail. But we soon suggested that they employ the same technique Jer and I had been using: go until you’re winded, then tap out and let the next person in line take over. Only now, instead of just two, we would have six bodies to do the work. After everyone had a turn at the front of the train, the benefits of working together became an unspoken truth, and our team forged ahead with a minimum of problems along the way.

Just before the Saddle, the trail opens into a talus field to reveal a stunning view of Mt. Rainier presiding over a snow-covered Olallie Lake. All the effort it took to get to this panorama was well worth it – the scene is framed by Pratt Mountain on the right and Bandera Mountain on the left, while the nearby trees were coated with a thick white frosting of snow. It was the perfect setting to carve out a place in the snow to have some lunch and bask in the sun.

This was a great hike: rewarding views, some unexpected pratt lake saddle olallie lake hikingwithmybrothercamaraderie, and a healthy dose of snowshoeing. The sunny weather brought out more folks than we expected, though the summer months will bring hundreds of hikers to this area. Try to find time to visit the Saddle and surrounding lakes before the mosquitoes and crowds make an appearance.

To get to the trailhead, take I-90 out to Exit 47. Take a left over the freeway to the “T.” Signs point left to the Pratt Lake and Granite Mountain Trailhead. Follow them a quarter mile to the small parking lot. On busy days, cars line the short distance to the popular trailhead, so just find a spot and hit the trail. - Nathan

Print Google Directions >>

Pratt Lake Saddle

15 Mile Creek - Tiger Mountain

Our Hiking Time: 3h 40m
Total Ascent: 1600ft
Highest Point: 2100ft
Total Distance: 10.5 miles
Location: N 47° 29.5980, W 121° 58.3800
Required Permit: Discover Pass
Difficulty: Moderate

Nathan's PhotoAlthough we were once again derailed by snow levels, this time we were prepared with a decent fallback hike. We’ve spent a great deal of time climbing the peaks in the Tiger Mountain State Forest, but we had yet to explore the more remote areas hidden in the recesses of the 13,500 acre wood. We’d found a couple of trails online, plugged them into our GPS and decided on a circuitous route out to 15 Mile Creek hoping to run across the fabled “Grand Canyon” we’d heard mention of.

tiger mountain 15 mile creek hikingwithmybrotherTiger Mountain Forest is a “working forest” – timber continues to be carefully harvested from the slopes, and radio towers and power boxes are sprinkled along the side of roads and at the top of various peaks. This means the landscape is constantly changing, and you’re never exactly sure what is around the next bend. While our journey started off on the usual logging road, we quickly leapt onto the Iverson Railroad Trail and then took us through a wide rage of terrain. We tromped past a clear cut to enter a young forest of cedar and fir before pushing deeper into more mature stands. We eventually lost the sound of the highway and enjoyed the snowy surroundings.

The Iverson Trail dumped us onto a logging road that we took up to the Tiger Mountain Trail, which stretches from one end of the Forest to the other. A little over two miles in, we found ourselves on the Artifacts Trail and soon came upon the namesake. tiger mountain 15 mile creek hikingwithmybrotherAt the turn of the 20th century Tiger Mountain was covered in thick stands of old growth, a lumber opportunity that was soon tapped by local logging interests. Among many others, a company called Woods & Iverson set up a mill 1912 that eventually operated and maintained many miles of logging roads and railroad on Tiger Mountain. On February 23rd 1925, an overloaded train hauling debris lost control and jumped the track at Holder Creek, killing a member of the crew who was unable to get off the train in time. Most of the wreck -- which included the engine, a passenger coach, some flat beds and a tracklayer -- was salvaged from the site and the bridge that used to span the creek is long gone. Still, some twisted metal evidence remains, quietly being devoured next to Holder Creek. Rusted wheels sets and spring boxes are piled to one side of the trail, and a few yards further on mangled rails and the moss-covered remains of the tracklayer lean haphazardly against some trees. The thick canopy overhead works with the noise of the creek to give the area a close feel thick with the smell of forest and damp earth.

Short on time, we pressed on to 15 Mile Creek in earnest, which ended up tiger mountain 15 mile creek hikingwithmybrotherputting us back on the Tiger Mountain Trail. The path stayed mostly flat before starting a slight descent toward the next trail intersection, Hobart Grade, which itself took us steeply down the creek. Unfortunately for us, we had not specifically sought out the “Grand Canyon” in our trail hunting, and our route deposited us next to a less-exciting section of 15 Mile Creek. The site is still appealing, though with more time we would have explored the area a bit more, probably heading downstream toward the Grand Canyon Trail. More than once we got a little turned around and had to backtrack, so next time we’ll bring along this trusty map to help us along.

This expedition was a welcome return to what we think of as a traditional hike because for the first time in a while we left the logging roads for some actual trails. The path was gentle and well-maintained and had we been following a more traditional route, we would have never lost our way. This was a vast improvement over recent trek up East Tiger and was a great way to discover lesser-known areas of the park.

To get there, take I-90 to Exit 25 Highway 18 junction. Take Highway 18 south for about 5 miles to the Tiger Summit Trailhead parking lot which will appear on your right. - Nathan

Print Google Directions >>

15 Mile Creek
Copyright 2008-2016 - hikingwithmybrother.com
hikingwithmybrother@gmail.com