about us | links | permit info
Subscribe to Hiking With My Brother Email Subscribe Follow Hiking With My Brother on Facebook Follow Hiking With My Brother on Twitter Hiking With My Brother Picasa Hiking With My Brother YouTube

Tin Cup Joe Falls

Our Hiking Time: 7h
Total Ascent: 1200ft
Highest Point: 2000ft
Total Distance: 11 miles
Location: N 47° 30.8520, W 121° 29.2560
Required Permit: Northwest Forest Pass
Difficulty: Moderate

Nathan's PhotoLast year, after tackling Stegosaurus Butte, we did some research and compiled a list of hikes we wanted to do in the Middle Fork Snoqualmie Valley. Less than a week after we came up with the list, a series of storms washed out large sections of the only access to the Middle Fork, Forest Road 56. Now, after months of repairs, FR 56 has been re-opened. This week we took advantage of the opening to explore the trail up to a somewhat hidden, but very impressive waterfall: Tin Cup Joe Falls.

tin cup joe falls hikingwithmybrotherThe falls are found on Cripple Creek as waters flow out of Derrick Lake down to the Middle Fork Snoqualmie River. Cripple Creek was known as Tin Cup Joe Creek back in the 1890’s, when mining was big in the Middle Fork Valley. Local miners evidently named the creek in honor of a roving prospector. Later, for reasons we were not able to dig up, it was renamed Cripple Creek. Today, those hiking along the Middle Fork Snoqualmie Trail #1003 cross the signed Cripple Creek as they continue on to Goldmyer Hot Springs.

There is no official or very clear trail all the way to Tin Cup Joe Falls. While this makes the trip a bit tricky, it also means you’re very likely to have this stunning set of falls all to yourself. And more good news is that two-thirds of the hike is an easy stroll along the well-maintained and much loved Middle Fork Snoqualmie Trail #1003. From the Gateway Bridge follow the trail tin cup joe falls hikingwithmybrotherabout five miles to Cripple Creek. On the west side of the bridge (before you cross) you should be able to make out the faint indications of a bootpath leading steeply up the hill. Take a few minutes to fuel up and get out the hiking poles - the next mile or so is not going to be easy.

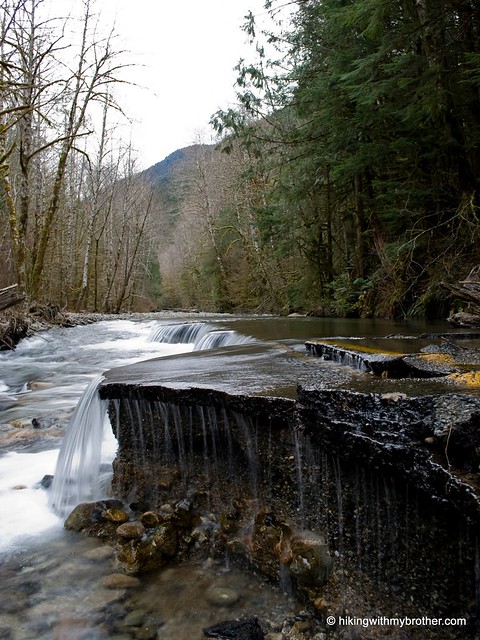
Keep an eye out for the subtle signs of well-worn vegetation. At times the trail will completely disappear or take short detours around blowdowns. When in doubt, follow the creek and the path of least resistance; generally the path reappears before you know it. As you continue to struggle onwards, a distant roar will begin to grow. You’ll glimpse the first set of falls cascading down from cliffs hundreds of feet above. As you make your way down to the creek to cross it, you’ll see another set of falls just upstream and realize the creek has branched, and that you’re looking at two sets of waterfalls for the price of one.

It is tempting to make a beeline to the horsetail falls you see ahead, but don’t clamber across the creek just yet. Although not quite as impressive from the creek level, we recommend you push past these first falls and continue on to the second set of Tin Cup Joe Falls. Circle wide and scramble up the rocks above short falls to a large rocky plateau. From here, water gushes off 200’ cliffs from three separate channels invisible from the creek below. This little alcove of amazing waterfalls are among the most impressive we’ve ever seen – though we’re sure that the volume of water helped make this tin cup joe falls hikingwithmybrotherall the more spectacular. Once you catch your breath, head back down and check out those other, taller, but a little less secluded, falls.

We highly recommend this hike. Although it’s a little rough, most hikers should be able to make it up to the falls if they’re comfortable with a little bushwhacking and route finding. There’s no serious risk of getting turned around and lost with the creek as your guide, and the elevation gain is significant enough to feel, but not insurmountable. Find the time to make the trip out to Tin Cup Joe Falls – it’s well worth it.

To get there, take Exit 34 off I-90 and take a left on 468th Ave. Follow the road past the truck stop for about a half-mile until you reach SE Middle Fork Road, also known as Forest Road 56. Continue to follow the twists in the road until the pavement runs out. From here it’s almost an 11 mile gravel road to the Middle Fork Trail head parking lot. The trailhead and Gateway Bridge are at the north end of the lot. -Nathan

Tin Cup Joe Falls

Lake Isabel Trail #1080

Our Hiking Time: 6h 20m
Total Ascent: 2400ft
Highest Point: 2850ft
Total Distance: 10 miles
Location: N 47° 51.9720, W 121° 35.9820
Required Permit: None
Difficulty: Hard

Nathan's PhotoDuring the winter months we always have a backup hike, just in case something goes awry on the way to the trailhead. This past week was another shining example of the need to fall back on “Plan B.” Our cursory research regarding a hike to Mineral City missed a key fact: the Index-Galena Road to the trailhead had been washed out. So we headed back to Gold Bar to explore a hike we knew very little about: the trail to Isabel Lake. We found the trailhead after some fumbling attempts, hit the trail and quickly discovered that we would very likely be alone for the duration of the hike.

index galena road hikingwithmybrotherThere’s not a lot out there on Isabel Lake, and we would now assume hikers simply avoid it. During our research, we learned that the area is beloved by many other outdoor-enthusiast types – mostly lovers of all-terrain vehicles and motorcycles. Evidence of their presence was legion. A goodly portion of the hike is along utility roads winding under power lines and by wrecked cars, while dodging mud holes and piles of garbage. Overhead you may hear the occasional float plane coming in to land on Isabel Lake, evidently an ideal recreational destination for pilots flying out of Seattle.

In addition to the trail being somewhat unpleasant, the path to the top is occasionally difficult to follow. Paths are constantly branching off from the main road and the road itself occasionally splits off in multiple directions. To make matters worse, bridges over May Creek are universally lake isabel falls hikingwithmybrotherwashed out, forcing a hiker to search up and down the riverside for a fallen log or some rocks to hop across. This is definitely a hike to bring the GPS on so that you can avoid getting turned around or lost.

As you continue to ascend, the road becomes progressively rougher and the crossings more treacherous. Perhaps during summer and early fall the water levels fall to a more approachable depth. When we crossed, the rocks were covered in layers of ice; pretty, but it made crossing particularly difficult. Perseverance across May Creek and up a particularly nasty washout will lead you to a marked trail into the forest. Here, the hike becomes enjoyable. More a bootpath than a full-fledged trail, the way is occasionally marked by pink ribbon, and it is clear that one needs to follow the creek in order to get to the lake.

We heard Isabel Falls before we saw it. We weren’t expecting a pretty amazing 200’ waterfall at the end of the hike – and this made up for some of the drudgery we’d endured to get there. The falls have a feeling of isolation and seclusion. Clambering up the rocks above the first tier of the waterfall is well worth the effort, and is the perfect place to settle down for lunch. We happily spent a good deal of time here just taking the waterfall in. lake isabel falls hikingwithmybrotherWhen you’re done basking, Isabel Lake is just a few hundred feet above – find and follow the trail on the right side of the falls to reach the shore.

This is a hard hike to recommend. While the goal is noble, most of the journey is unpleasant. However, we do note that with the area currently closed to motorized vehicles, this might be the best time to explore Isabel Lake. We can’t say this is a hike for just anyone – it’s a slog, and one should definitely have a good deal of experience hiking and navigating via map or GPS before attempting it.

To get there, take Highway 2 through Gold Bar. About two miles past town take a left on Reiter Road. Follow Reiter Road for another two miles, avoiding the turn down May Creek Road. There should a large graveled area on the left after two miles. Find a place to park and unload. Follow the access road toward the powerlines and onward to Isabel Lake. -Nathan

Lake Isabel

Wallace Falls Loop

Our Hiking Time: 3h 15m
Total Ascent: 1150ft
Highest Point: 1500ft
Total Distance: 6.3 miles
Location: N 47° 52.5120, W 121° 38.7900
Required Permit: Discover Pass
Difficulty: Moderate

Nathan's PhotoThe slow recovery of a sprained ankle is keeping us from our usual lofty heights, but is also providing us with an opportunity to explore some hikes we would normally overlook. This week we made it out to Wallace Falls State Park to do a little tromping around. We have not been to a Washington State Park since we visited Olallie back in January – it was good to do a hike a little closer to civilization for a change.

Created in 1975, Wallace Falls State Park covers almost five thousand wallace falls hikingwithmybrotheracres of mountains, lakes, and forest. The many features dubbed “Wallace” in the area were named for Joe and Sarah Kwayaylsh, Skykomish tribe members among the first homesteaders to settle nearby. Around the 1920’s the area was logged extensively and a railroad was built to haul timber back to Seattle. The tracks are long gone, but the grade remains and is a popular for biking and trail running.

The trail begins under buzzing powerlines, but quickly ducks beneath the shelter of second-generation forest. Shortly after entering the woods, the trail diverges; the old railroad grade veers left, and to the right the Woody Trail hop-scotches up the river stopping at prominent cascades along the way. The Woody Trail was named in honor of the late senator Frank Woody, who was a stalwart advocate for the Youth Corps that helped build the trail.

The winding path is short and well marked – a map indicating where you are at is occasionally posted along the trail and at picnic shelters near the falls. There are a few hills along the way, but they should not pose much of a challenge. The pounding of thousands of feet along this popular trail keeps the path flat and wide, and the constant vigilance of trail advocates keep it in good shape. Even on the chilly, rainy day we hiked this trail there were many other folks on it, so expect some company – though the close proximity to the river blankets most of the hike in the din of rushing water lending a feeling of isolation.

The falls themselves are impressive. Each of the lower, middle and upper falls are upwards of 200’ drops, creating an exciting scene. Often what you can see from the trail isn’t ideal, but closer looks require a precarious scramble out on slick rocks high above the river, which have wallace falls hikingwithmybrotherbeen wisely barricaded behind railings and warning signs. Once you reach the upper falls, you have the option of taking the railroad grade back the parking lot, making the trip a loop.

This hike is absolutely accessible to the whole family and is great for a short jaunt out to see a little nature. Those looking for a hike should probably skip this for something a bit more challenging – this is more of a stroll – but it certainly has some big rewards for little effort. If you’re looking for something more, there is a lot of park to explore – a hike out to Wallace Lake, for instance, is a 12-mile commitment that might satisfy more adventurous appetites.

To get there, take Highway 2 east to Gold Bar and follow the copious signage directing you to take a left on First Street and beyond to Wallace Falls State Park. In recent years, the park was charging an entrance fee, though this practice seems to have gone by the wayside. Park and hit the trail! -Nathan

Wallace Falls
Copyright 2008-2016 - hikingwithmybrother.com
hikingwithmybrother@gmail.com